Setting Up AP Webfeeds
The AP WebFeeds platform delivers AP news and multimedia content to your organization via an HTTP feed for easy integration with your newsroom and content management systems. With WebFeeds, you have more control and options over content delivery than ever before.
To use AP WebFeeds, you can use either WebFeeds-capable Newsroom Computer Systems or the free software (WebFeeds Manager and WebFeeds Agent) - or your own in-house programming talent - to communicate with, and receive content from, the AP s servers. This Tech Doc will demonstrate the setup and configuration of the Webfeeds Manager, and Webfeeds Agent.
Before attempting installation and/or configuration of the WebFeeds Manager or WebFeeds Agent please contact the Associated Press Bureau Rep in your area to get set up with a user account and credentials. Please ensure that you have the latest versions of Java and Silverlight installed on the capture machine. Once set up with an account, have the bureau rep create a profile, choose entitlements and download an agent for you. You can also download the open source virtual serial port software com0com from http://com0com.sourceforge.net
Note:
If you are running a 64-bit O/S please ensure that you launch the 64-bit version of IE when you go to https://www.java.com . This will let you install the 64-bit version of Java needed to run the WebFeedsAgent .jar file without issue.
You can simply change the options of your existing KLZ WireCapture32 to reflect the new webfeeds, and save the AP Webfeed Agent's .jar file to the same directory. If you'll be running it on a different capture PC, create a folder off the root of the drive to hold the new AP Webfeed Agent's .jar file. You can name it something like APWeb for example.
Webfeeds Manager Profile Setup
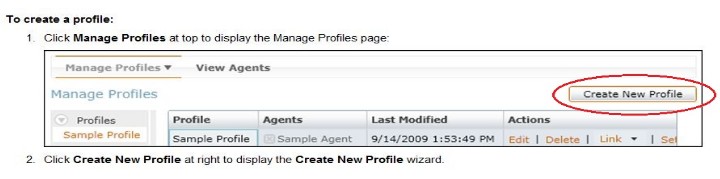
In the New Profile field, using your call letters for a profile name is a good idea. Check that the radio button is on 'create new empty profile. Once filled in click 'Next'.
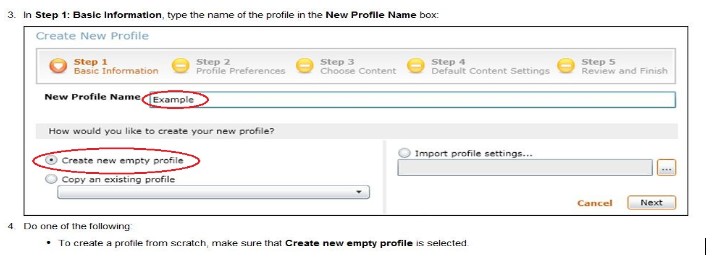
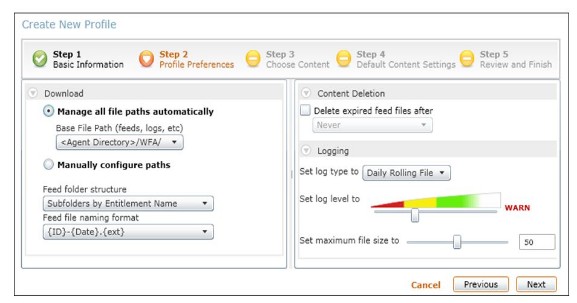
The default settings in step 2 should be fine the way they are. Click the 'Next' button.
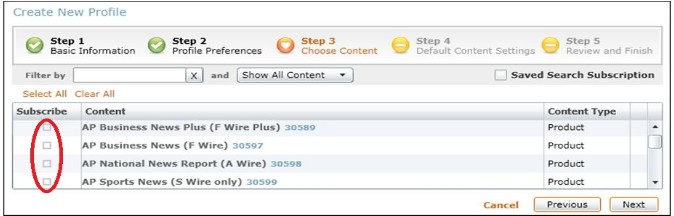
In Step 3 check all entitlements that apply to your AP subscription and click the 'Next' button.
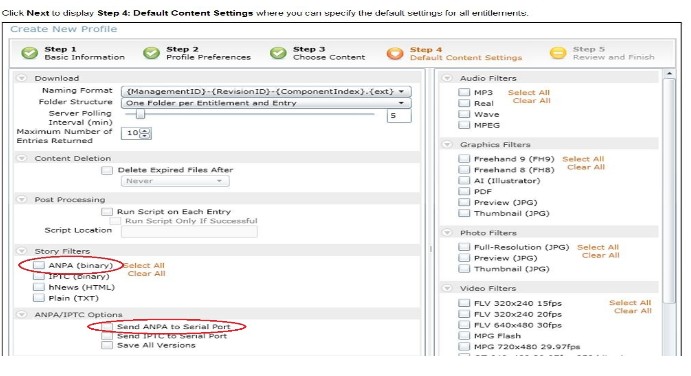
In Step 4 check the boxes 'ANPA' and 'Send ANPA to Serial Port'. Click the 'Next' button.
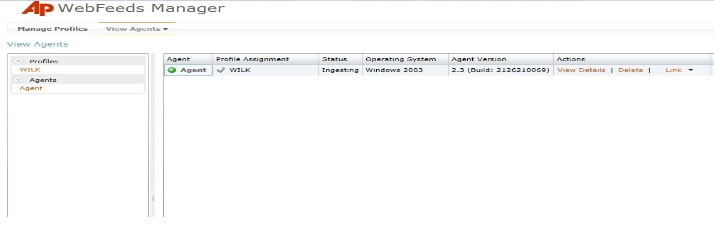
Once you run the AP Webfeeds Agent, log in, and name your agent, you can link the agent to your profile in the Webfeeds Manager. Using the drop down in the 'Link' column will display your agent, as well as the left hand pane below your profile name.
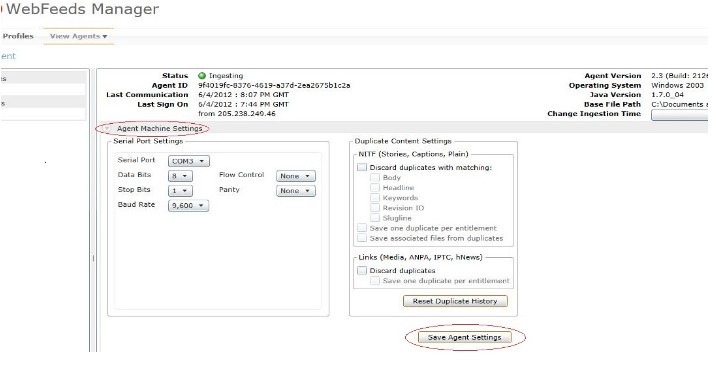
Clicking on the 'Agent Machine Settings' will expose the settings for the Serial Port, Baud Rate, etc. Choose the appropriate com port, and other settings. When you're done, save the agent settings.
com0com Install and Setup
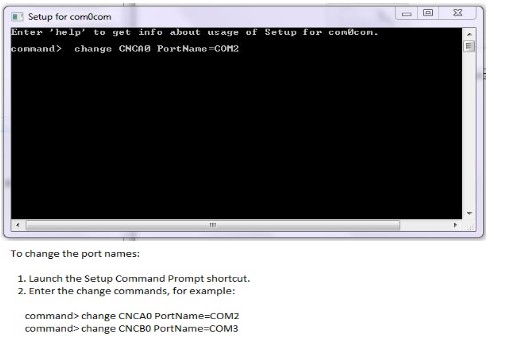
Unzip the com0com Setup.exe and Readme.txt files. Double click the Setup to start the installation process, and follow the prompts.Once installation is complete run the "Setup Command Prompt". The Readme.txt file has instructions on how to change the display names of the default com ports (example: CNCAO = Com2) that are created by com0com to comprehensible port names. Depending on the O/S version you're running, a reboot may be required.
NOTE:
(x64-based Windows Vista/ Server 2008/ Windows7): The com0com.sys is a test-signed kernel-mode driver that will not load by default. To enable test signing, enter the command:
bcdedit.exe -set TESTSIGNING ON
and reboot the computer.
Also note that turning off UAC or enabling test signing will impair computer security.
**
When downloading Com0Com, make sure you get the proper driver for your operating system's bit depth; 32 or 64-bit
**
Simply run the installer (setup.exe). An installation wizard will guide you through the required steps. If the Found New Hardware Wizard will pop up then:
-
select
"No, not this time" and click Next;
- select "Install the software automatically (Recommended)" and click Next. The one COM port pair with names CNCA0 and CNCB0 will be available on your system after the installation.
Once you're done with the command prompt setup, you can run com0com, and/or check the device manager to verify the new virtual ports you've created.
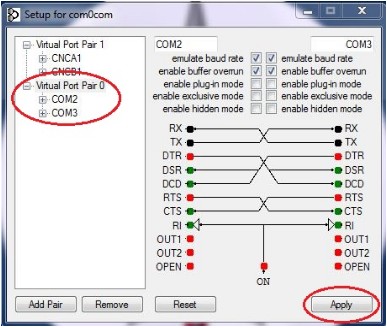
Take a copy of your existing WireCapture32.exe, along with the config file and paste them into your APWeb folder. Create a desktop shortcut and rename it to reflect the new AP feed. Run the new WireCapture32 and check de-activate. Go to the options and set the com port to the 2nd virtual port.
Example: If you created virtual ports 2 + 3, the Webfeed Agent would be set to Com 2 and the KLZ WireCapture32 would be set to Com 3.
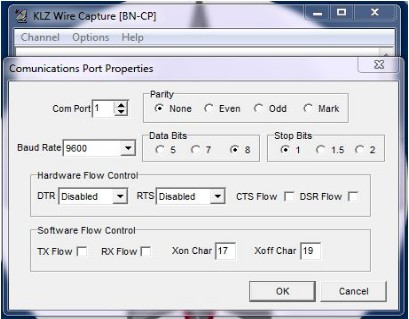
After the Com port, baud rate, server IP, and service name are set, click on 'Cat Map' and refresh the categories and priorities.

Click Done . Then click channel, exit and relaunch your WireCapture32. Once you see the new AP webfeeds coming in, you can de-activate the AP satellite feed.